Running Odoo on Docker can be a smart choice because it simplifies setup, ensures consistency across environments, and makes deployment faster and more scalable. With Docker, all dependencies such as PostgreSQL, Python libraries, and Odoo itself are containerized, reducing compatibility issues and allowing you to spin up or replicate instances quickly. It also makes it easier to manage upgrades, isolate development environments, and run multiple Odoo versions on the same machine without conflict. This is how to running Odoo on Docker based on my experience (I currently on my way to learning Odoo). If you want to know about how to use Docker, you can follow this article here.
Prepare your Odoo sourcecode
The first step before running Odoo on Docker is to prepare your Odoo sourcecode that you want to install and running on Docker. Please be aware that only Odoo Community or Odoo Enterprise that can be deployed on premise. In this case, I will using Odoo Enterprise.
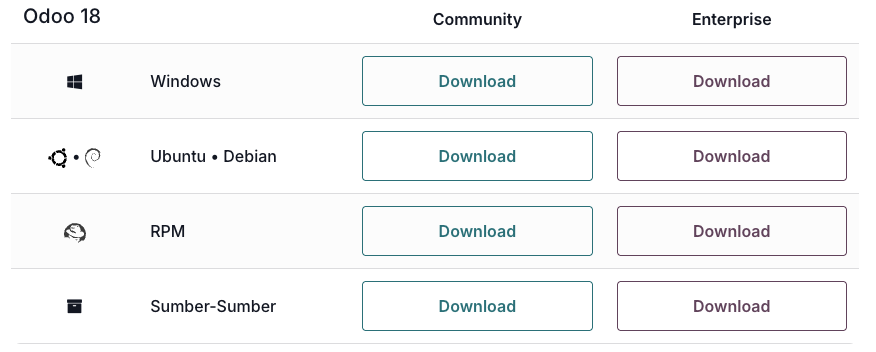
- Go to Odoo download page and download the sourcecodes. You can choose the version based on your need. In my case, I use Odoo 18.

- There are 2 ways to get Odoo source code. The first way is download it from Odoo’s Github branch. The second way is download from Odoo official website. For community source code it will be the same, but for enterprise source code it is a little different. When you download your enterprise source code from Github, it only contains extended enterprise module without community module inside it. So you need to download and import both of community and enterprise if you want to deploy it on premise. But if you download enterprise source code from Odoo official website, it contains full source code included community module inside it. So you don’t need to download it separately.
- In my case, I want to put community and enterprise module separately so you can manage it separately. If you want to install just community edition, you can skip Enterprise download and just using community edition source code.
- Odoo download page will ask you subscription number to be filled if you want to download Enterprise source code, you need to subscribe first and input it. After you input the correct you will be able to download the source code.
- After finish download the code, extract and rename this to “odoo” for the community source code, and “enterprise” for enterprise source code. You can choose your own or follow my setup.
Prepare working folder
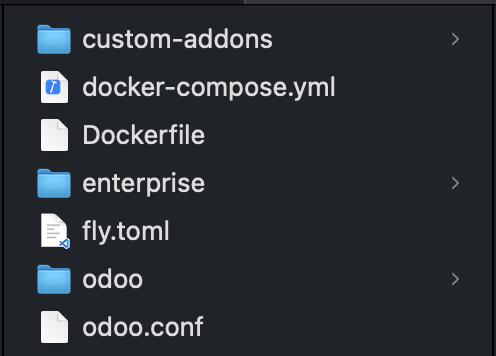
The next step is to prepare your working folder. To using Docker, you need to prepare a working folder to collect dependency and all the require file like dockerfile, env, and configuration file. Here my working folder structure as example:

On my example, there are some additional files and configuration, but you can ignore fly.toml configuration file if you don’t want to deploy your Odoo application to Fly.io (in my case I want to deploy it to Fly.io). There are folders including enterprise and odoo (community code) in my working folder, odoo folder may not be necessary if you on enterprise plan with condition as I explained above. Here I describe each files/folders:
- odoo folder . It is Odoo community edition sourcecode (If needed). You need to include this as base sourcecode if you download sourcecode from github.
- enterprise folder. It is Odoo enterprise edition sourcecode. You only need to include this if you want to use Odoo Enterprise. If not, you can ignore it.
- custom-addons folder. It is Odoo custom plugins. It’s needed to use custom code and will needed if you want to modify Odoo for some custom needs. If you don’t have any custom addons, just create this folder and leave it empty.
- odoo.conf . It is Odoo configuration file. This file includes credential setup that you will use in Odoo.
- Dockerfile . Docker configuration file to define about how docker will build your image.
- docker-compose.yml . Docker Compose configuration file to define about how docker-compose will setting up and running your application on the docker container.
This is example of each configuration file. You can modify it based on your needs.
odoo.conf
[options]  // Section header for Odoo configuration options

xmlrpc_interface = 0.0.0.0       // Odoo will listen on all network interfaces (public & private IPs)
xmlrpc_port = 8069               // The port for Odoo’s main HTTP/XML-RPC service (default: 8069)
netrpc_interface = 0.0.0.0       // Enables Net-RPC (deprecated) on all interfaces — usually not required

addons_path = /mnt/custom-addons,/mnt/odoo/odoo/addons,/mnt/enterprise/odoo/addons
                                // Comma-separated paths where Odoo will search for addons:
                                // 1. Custom addons
                                // 2. Core (community) addons if needed
                                // 3. Enterprise addons

db_host = db                    // Hostname of the PostgreSQL server (likely a Docker service name or internal DNS)
db_port = 5432                  // PostgreSQL port (default: 5432)
db_user = username              // PostgreSQL username Odoo will use to connect
db_password = password          // Password for the above database user

list_db = True                  // Allows database listing on the login screen (can be a security risk in production)

admin_passwd = myadminpassword  // Master password used for DB creation, backup, restore from web interface

dbfilter = .*                   // Regex filter for allowed databases (.* means all databases are accessible)
Dockerfile
FROM odoo:18

USER root

RUN apt-get update && \
    apt-get install -y wget gnupg lsb-release && \
    echo "deb http://apt.postgresql.org/pub/repos/apt $(lsb_release -cs)-pgdg main" > /etc/apt/sources.list.d/pgdg.list && \
    wget --quiet -O - https://www.postgresql.org/media/keys/ACCC4CF8.asc | apt-key add - && \
    apt-get update && \
    apt-get install -y \
    nano \
    wkhtmltopdf \
    libldap2-dev libsasl2-dev python3-dev libxml2-dev libxslt1-dev \
    libzip-dev libjpeg-dev zlib1g-dev \
    libpq-dev=17.5-1.pgdg24.04+1 libpq5=17.5-1.pgdg24.04+1 && \
    apt-get clean && rm -rf /var/lib/apt/lists/*

USER odoo

# Set workdir
WORKDIR /opt/odoo

# Copy odoo.conf into the container
COPY odoo.conf /etc/odoo/odoo.conf

# Copy odoo source
COPY ./odoo /mnt/odoo #community sourcecode if needed
COPY ./enterprise /mnt/enterprise
COPY ./custom-addons /mnt/custom-addons

# Expose port 8080 (Fly expects this)
EXPOSE 8069

# Run Odoo with the correct config
CMD ["odoo", "-c", "/etc/odoo/odoo.conf"]
docker-compose.yml
services:
  db:
    image: postgres:17.2
    container_name: db-${ENV_NAME}
    environment:
      POSTGRES_DB: ${DB_NAME}
      POSTGRES_USER: ${DB_USER}
      POSTGRES_PASSWORD: ${DB_PASSWORD}
    volumes:
        - ${DB_VOLUME_NAME}:/var/lib/postgresql/data
        - odoo-files:/mnt/odoo_files
  odoo:
    build: .
    depends_on:
      - db
    container_name: odoo-${ENV_NAME}
    ports:
      - "${PORT}:8069"
    environment:
      - HOST=db
      - USER=${DB_USER}
      - PASSWORD=${DB_PASSWORD}
    volumes:
      - ./odoo:/mnt/odoo #community code if needed
      - ./enterprise:/mnt/enterprise
      - ./custom-addons:/mnt/custom-addons
      - ./odoo.conf:/etc/odoo/odoo.conf
volumes:
  db-data-dev: {}
  db-data-production: {}
  odoo-files:
In my case, i use separate .env file to make it easy to configure different environment. You can create your own on your working directory with name .env.<environment> . Here the sample code of .env.dev :
.env.dev
PORT=8069
DB_PORT=5432
DB_NAME=dev_db
DB_USER=username
DB_PASSWORD=password
DB_VOLUME_NAME=db-data-dev
ENV_NAME=dev
These are the items that you need to prepare first before you ready to running Odoo on Docker. If you finish the setup, let’s move to the next part.
Running docker-compose
The next step is using docker-compose to running your Odoo on Docker. Open terminal and enter to your working folder. And then execute this command:
docker-compose --env-file .env.dev up -d --build.env.dev is my env file, you can change with your env file name. Wait until it finish the process.
Init database
Something you need to know is that after installing all of these, you need to init the database manually so all the basic data can be used as default before you modify it manually on Odoo backend page. Execute this command from your working folder directory using terminal.
docker exec -it odoo-dev odoo -d dev_db -i base --stop-after-initodoo-dev is the name of my docker container. dev_db is the name of my database. You can find this on your Odoo configuration file above.
Open your Odoo application
After all the steps above done, you can open your Odoo application via web browser by open the localhost url + port. In my case, I open my Odoo application with this url: http://localhost:8069 .
Conclusion
Docker container based can be easy alternative to running your Odoo application in local environment. It will be good option for development phase to simplify installation process. To make it online, you can refer to this article.


